7-31-工作琐事

1. Get a mail from a colleague this morning

When you commit code, make sure you do it with your real name, and a proper email address (your scilearn address). You can set your name like this, in the repo:

1
2
$ git config user.name "Hot Day"
$ git config user.email "hday@hotday.com.cn"

You can also do it globally, for all repos:

1
2
$ git config --global user.name "Hot Day"
$ git config --global user.email "hday@hotday.com.cn"

and check the current name and email of a repo:

1
2
$ git config --get user.name
$ git config --get user.email

Thanks!


2. factory_girl and mysql

truncate 清空的表 id 会从新记录, 而 delete 清空的表则不会从新记录 会继续原数据记录,当然这里 id 为自增长。

When I am writing the cucucmber features for our new project, we meet an issue:

the snippet below will not work.

1
2
3
Given the following posts exist
| id | name | description | user_id |
| 1 | a post | This is a post | 1 |

If everything is ok, the Given will find the step in pickle_step.rb:

1
2
3
4
# create models from a table
Given(/^the following #{capture_plural_factory} exists?:?$/) do |plural_factory, table|
create_models_from_table(plural_factory, table)
end

And the code will call the factory which defined before using factory_girl.
Then it will save a post in database sure enough.

But it says

Mysql2::Error: Cannot add or update a child row: a foreign key constraint fails

Obviously, we have something wrong with the user_id field. And more obviously, we have not generate a user.

I thought before the factory_girl will take care of the association object if there is no record in database.
Actually, if we feed the factory attributes, factory_girl will take these values and create a post object rather than create a association record.

So here, it won’t create a user with id 1. The Given will be interpreted to a sql at last:

1
INSERT INTO `posts` ( `created_at`, `description`, `id`, `name`, `updated_at`, `user_id`) VALUES ('2013-07-31 06:12:41', 'This is a post', 1, 'a post', 1, '2013-07-31 06:12:41', 1)

And we have a foreign key constraint on user_id, of course it will fail.

###Solutions:

  1. Given a user with name: “Test”
  2. Prepare a user before test.
  3. If the user does not matter, just remove user_id, let factory_girl take care of user.

3. Capybara get the native css value

element.native.css_value("text-overflow")

  1. element is the capybara element
  2. native is used to get the selenium-webdriver element
  3. css_value is used to get the computed style.

我的 vimrc

##Update##

1. 删除restore_view, 使用以下片段代替

1
2
3
4
5
6
7
8
9
10
" Remove restore_view, since mkview will break rails vim in mac
" When editing a file, always jump to the last known cursor position.
" Don't do it when the position is invalid or when inside an event handler
" (happens when dropping a file on gvim).
" Also don't do it when the mark is in the first line, that is the default
" position when opening a file.
autocmd BufReadPost *
\ if line("'\"") > 1 && line("'\"") <= line("$") |
\ exe "normal! g`\"" |
\ endif

理由见:tpope/vim-rails#25, restore_view (mkview) 导致 rails.vim 一直报错: E345: Can’t find file “xxx” in path。

2. 加入 terryma/vim-multiple-cursors

There have been many attempts at bringing Sublime Text’s awesome multiple selection feature into Vim,
but none so far have been in my opinion a faithful port that is simplistic to use,
yet powerful and intuitive enough for an existing Vim user. vim-multiple-cursors is yet another attempt at that.


spf13

Janus

我的vim

1
2
3
4
5
6
7
8
9
10
11
12
13
14
15
16
17
18
19
20
21
22
23
24
25
26
27
28
29
30
31
32
33
34
35
36
37
38
39
40
41
42
43
44
45
46
47
48
49
50
51
52
53
54
55
56
57
58
59
60
61
62
63
64
65
66
67
68
69
70
71
72
73
74
75
76
77
78
79
80
81
82
83
84
85
86
87
88
89
90
91
92
93
94
95
96
97
98
99
100
101
102
103
104
105
106
107
108
109
110
111
112
113
114
115
116
117
118
119
120
121
122
123
124
125
126
127
128
129
130
131
132
133
134
135
136
137
138
139
140
141
142
143
144
145
146
147
148
149
150
151
152
153
154
155
156
157
158
159
160
161
162
163
164
165
166
167
168
169
170
171
172
173
174
175
176
177
178
179
180
181
182
183
184
185
186
187
188
189
190
191
192
193
194
195
196
197
198
199
200
201
202
203
204
205
206
207
208
209
210
211
212
213
214
215
216
217
218
219
220
221
222
223
224
225
226
227
228
229
230
231
232
233
234
235
236
237
238
239
240
241
242
243
244
245
246
247
248
249
250
251
252
253
254
255
256
257
258
259
260
261
262
263
264
265
266
267
268
269
270
271
272
273
274
275
276
277
278
279
280
281
282
283
284
285
286
287
288
289
290
291
292
293
294
295
296
297
298
299
300
301
302
303
304
305
306
307
308
309
310
311
312
313
314
315
316
317
318
319
320
321
322
323
324
325
326
327
328
329
330
331
332
333
334
335
336
337
338
339
340
341
342
343
344
345
346
347
348
349
350
351
352
353
354
355
356
357
358
359
360
361
362
363
364
365
366
367
368
369
370
371
372
373
374
375
376
377
378
379
380
381
382
383
384
385
386
387
388
389
390
391
392
393
394
395
396
397
398
399
400
401
402
403
404
405
406
407
408
409
410
411
412
413
set nocompatible " be iMproved
filetype off " required!
set rtp+=~/.vim/bundle/vundle/
call vundle#rc()
" let Vundle manage Vundle
" required!
Bundle 'gmarik/vundle'
" My Bundles here:
""
"" General
""
Bundle 'MarcWeber/vim-addon-mw-utils'
Bundle 'tomtom/tlib_vim'
if executable('ack-grep')
let g:ackprg="ack-grep -H --nocolor --nogroup --column"
Bundle 'mileszs/ack.vim'
elseif executable('ack')
Bundle 'mileszs/ack.vim'
elseif executable('ag')
Bundle 'mileszs/ack.vim'
let g:ackprg = 'ag --nogroup --nocolor --column --smart-case'
endif
Bundle 'scrooloose/nerdtree'
Bundle 'jistr/vim-nerdtree-tabs'
Bundle 'tpope/vim-surround'
Bundle 'Raimondi/delimitMate'
Bundle 'kien/ctrlp.vim'
Bundle 'Lokaltog/vim-easymotion'
Bundle 'godlygeek/csapprox'
Bundle 'matchit.zip'
""
"" Themes and Colors
""
Bundle 'flazz/vim-colorschemes'
Bundle 'bling/vim-airline'
""
"" Programming
""
Bundle 'scrooloose/syntastic'
Bundle 'tpope/vim-fugitive'
Bundle 'airblade/vim-gitgutter'
Bundle 'mattn/webapi-vim'
Bundle 'mattn/gist-vim'
Bundle 'scrooloose/nerdcommenter'
Bundle 'godlygeek/tabular'
if executable('ctags')
Bundle 'majutsushi/tagbar'
endif
Bundle 'nathanaelkane/vim-indent-guides'
" Python
Bundle 'klen/python-mode'
Bundle 'python.vim'
Bundle 'python_match.vim'
Bundle 'pythoncomplete'
" Javascript
Bundle 'elzr/vim-json'
Bundle 'groenewege/vim-less'
Bundle 'pangloss/vim-javascript'
Bundle 'briancollins/vim-jst'
Bundle 'kchmck/vim-coffee-script'
" Java
Bundle 'derekwyatt/vim-scala'
Bundle 'derekwyatt/vim-sbt'
" HTML
Bundle 'amirh/HTML-AutoCloseTag'
Bundle 'hail2u/vim-css3-syntax'
Bundle 'tpope/vim-haml'
Bundle 'mattn/zencoding-vim'
Bundle 'chrisbra/color_highlight'
" Ruby
Bundle 'tpope/vim-rails'
let g:rubycomplete_buffer_loading = 1
Bundle 'tpope/vim-cucumber'
Bundle 'quentindecock/vim-cucumber-align-pipes'
Bundle 'vim-ruby/vim-ruby'
" Markdown
Bundle 'tpope/vim-markdown'
" Snippets
Bundle 'Shougo/neocomplcache'
Bundle 'Shougo/neosnippet'
Bundle 'honza/vim-snippets'
filetype plugin indent on " required!
"" Settings
let mapleader = ','
set background=dark
if filereadable(expand("~/.vim/bundle/vim-colorschemes/colors/ir_black.vim"))
colorscheme ir_black
endif
set history=700
set nu
syntax on
set hidden
set virtualedit=onemore
set showmatch
set cursorline
highlight clear SignColumn
set visualbell
set mouse=a
set mousehide
set autochdir
autocmd BufEnter * silent! lcd %:p:h
" Remove restore_view, since mkview will break rails vim in mac
" When editing a file, always jump to the last known cursor position.
" Don't do it when the position is invalid or when inside an event handler
" (happens when dropping a file on gvim).
" Also don't do it when the mark is in the first line, that is the default
" position when opening a file.
autocmd BufReadPost *
\ if line("'\"") > 1 && line("'\"") <= line("$") |
\ exe "normal! g`\"" |
\ endif
""
"" encoding
""
set encoding=utf-8
set fileencodings=utf-8,gbk,cp936,latin-1
set termencoding=utf-8
""
"" Paste
""
if has ('x') && has ('gui') " On Linux use + register for copy-paste
set clipboard=unnamedplus
elseif has ('gui') " On mac and Windows, use * register for copy-paste
set clipboard=unnamed
endif
set pastetoggle=<F12>
""
"" Status line
""
set showmode
if has('statusline')
set laststatus=2
" Broken down into easily includeable segments
set statusline=%<%f\ " Filename
set statusline+=%w%h%m%r " Options
set statusline+=%{fugitive#statusline()} " Git Hotness
set statusline+=\ [%{&ff}/%Y] " Filetype
set statusline+=\ [%{getcwd()}] " Current dir
set statusline+=%=%-14.(%l,%c%V%)\ %p%% " Right aligned file nav info
endif
if has('cmdline_info')
set ruler
set rulerformat=%30(%=\:buf%n%y%m%r%w\ %l,%c%V\ %P%)
set showcmd
endif
""
"" Backup
""
set nobackup
set nowb
set noswapfile
if has('persistent_undo')
set undodir=~/.vim/undofiles
set undofile " So is persistent undo ...
set undolevels=1000 " Maximum number of changes that can be undone
set undoreload=10000 " Maximum number lines to save for undo on a buffer reload
endif
""
"" Indent
""
set smartindent
set autoindent
""
"" Whitespace and Tab
""
set nowrap
set smarttab
set tabstop=2
set shiftwidth=2
set expandtab
set backspace=indent,eol,start
""
"" List
""
set list
set listchars=tab:›\ ,trail:•,extends:#,nbsp:. " Highlight problematic whitespace
""
"" Searching
""
set hlsearch " highlight matches
set incsearch " incremental searching
set ignorecase " searches are case insensitive...
set smartcase " ... unless they contain at least one capital letter
""
"" Wild settings
""
set wildmode=list:longest,full
set wildmenu
set wildignore+=*.o,*.out,*.obj,.git,*.rbc,*.rbo,*.class,.svn,*.gem
set wildignore+=*.zip,*.tar.gz,*.tar.bz2,*.rar,*.tar.xz
set wildignore+=*/vendor/gems/*,*/vendor/cache/*,*/.bundle/*,*/.sass-cache/*
set wildignore+=*.swp,*~,._*,*.bak
""
"" Vundles settings
""
"" airline
""
set t_Co=256
let g:airline_powerline_fonts=1
let g:airline_theme='light'
" unicode symbols
let g:airline_left_sep = '»'
let g:airline_left_sep = '▶'
let g:airline_right_sep = '«'
let g:airline_right_sep = '◀'
let g:airline_linecolumn_prefix = '␊ '
let g:airline_linecolumn_prefix = '␤ '
let g:airline_linecolumn_prefix = '¶ '
let g:airline_fugitive_prefix = '⎇ '
let g:airline_paste_symbol = 'ρ'
let g:airline_paste_symbol = 'Þ'
let g:airline_paste_symbol = '∥'
"" NerdTree
""
map <C-e> :NERDTreeToggle<CR>:NERDTreeMirror<CR>
map <leader>e :NERDTreeFind<CR>
nmap <leader>nt :NERDTreeFind<CR>
let NERDTreeShowBookmarks=1
let NERDTreeIgnore=['\.pyc', '\~$', '\.swo$', '\.swp$', '\.git', '\.hg', '\.svn', '\.bzr']
let NERDTreeChDirMode=0
let NERDTreeQuitOnOpen=1
let NERDTreeMouseMode=2
let NERDTreeShowHidden=1
let NERDTreeKeepTreeInNewTab=1
let g:nerdtree_tabs_open_on_gui_startup=0
"" ctrlp
""
let g:ctrlp_working_path_mode = 'ra'
nnoremap <silent> <leader>f :CtrlPBuffer<CR>
let g:ctrlp_custom_ignore = {
\ 'dir': '\.git$\|\.hg$\|\.svn$',
\ 'file': '\.exe$\|\.so$\|\.dll$\|\.pyc$' }
" On Windows use "dir" as fallback command.
if has('win32') || has('win64')
let g:ctrlp_user_command = {
\ 'types': {
\ 1: ['.git', 'cd %s && git ls-files . --cached --exclude-standard --others'],
\ 2: ['.hg', 'hg --cwd %s locate -I .'],
\ },
\ 'fallback': 'dir %s /-n /b /s /a-d'
\ }
else
let g:ctrlp_user_command = {
\ 'types': {
\ 1: ['.git', 'cd %s && git ls-files . --cached --exclude-standard --others'],
\ 2: ['.hg', 'hg --cwd %s locate -I .'],
\ },
\ 'fallback': 'find %s -type f'
\ }
endif
"" TagBar
""
nnoremap <silent> <leader>tt :TagbarToggle<CR>
"" Indent guide
""
let g:indent_guides_start_level = 2
let g:indent_guides_guide_size = 1
let g:indent_guides_enable_on_vim_startup = 1
let g:indent_guides_auto_colors = 1
""
"" Color
let g:colorizer_auto_color = 1
let g:colorizer_auto_filetype='css,html'
let g:colorizer_skip_comments = 1
let g:colorizer_colornames = 0
""
"" OmniComplete
if has("autocmd") && exists("+omnifunc")
autocmd Filetype *
\if &omnifunc == "" |
\setlocal omnifunc=syntaxcomplete#Complete |
\endif
endif
hi Pmenu guifg=#000000 guibg=#F8F8F8 ctermfg=black ctermbg=Lightgray
hi PmenuSbar guifg=#8A95A7 guibg=#F8F8F8 gui=NONE ctermfg=darkcyan ctermbg=lightgray cterm=NONE
hi PmenuThumb guifg=#F8F8F8 guibg=#8A95A7 gui=NONE ctermfg=lightgray ctermbg=darkcyan cterm=NONE
au CursorMovedI,InsertLeave * if pumvisible() == 0|silent! pclose|endif
set completeopt=menu,preview,longest
"" Neocomplcache
""
let g:acp_enableAtStartup = 0
let g:neocomplcache_enable_at_startup = 1
let g:neocomplcache_enable_smart_case = 1
let g:neocomplcache_min_syntax_length = 3
imap <C-k> <Plug>(neosnippet_expand_or_jump)
smap <C-k> <Plug>(neosnippet_expand_or_jump)
imap <expr><TAB> neosnippet#jumpable() ? "\<Plug>(neosnippet_expand_or_jump)" : pumvisible() ? "\<C-n>" : "\<TAB>"
smap <expr><TAB> neosnippet#jumpable() ? "\<Plug>(neosnippet_expand_or_jump)" : "\<TAB>"
" For snippet_complete marker.
if has('conceal')
set conceallevel=2 concealcursor=i
endif
" Define dictionary.
let g:neocomplcache_dictionary_filetype_lists = {
\ 'default' : '',
\ 'vimshell' : $HOME.'/.vimshell_hist',
\ 'scheme' : $HOME.'/.gosh_completions'
\ }
" Plugin key-mappings.
inoremap <expr><C-g> neocomplcache#undo_completion()
inoremap <expr><C-l> neocomplcache#complete_common_string()
" Recommended key-mappings.
" <CR>: close popup and save indent.
inoremap <silent> <CR> <C-r>=<SID>my_cr_function()<CR>
function! s:my_cr_function()
return neocomplcache#smart_close_popup() . "\<CR>"
" For no inserting <CR> key.
"return pumvisible() ? neocomplcache#close_popup() : "\<CR>"
endfunction
" <TAB>: completion.
" inoremap <expr><TAB> pumvisible() ? "\<C-n>" : "\<TAB>"
" <C-h>, <BS>: close popup and delete backword char.
inoremap <expr><C-h> neocomplcache#smart_close_popup()."\<C-h>"
inoremap <expr><BS> neocomplcache#smart_close_popup()."\<C-h>"
inoremap <expr><C-y> neocomplcache#close_popup()
inoremap <expr><C-e> neocomplcache#cancel_popup()
" Enable omni completion.
autocmd FileType css setlocal omnifunc=csscomplete#CompleteCSS
autocmd FileType html,markdown setlocal omnifunc=htmlcomplete#CompleteTags
autocmd FileType javascript setlocal omnifunc=javascriptcomplete#CompleteJS
autocmd FileType python setlocal omnifunc=pythoncomplete#Complete
autocmd FileType xml setlocal omnifunc=xmlcomplete#CompleteTags
"autocmd FileType ruby setlocal omnifunc=rubycomplete#Complete
autocmd FileType haskell setlocal omnifunc=necoghc#omnifunc
" Enable heavy omni completion.
if !exists('g:neocomplcache_omni_patterns')
let g:neocomplcache_omni_patterns = {}
endif
let g:neocomplcache_omni_patterns.php = '[^. \t]->\h\w*\|\h\w*::'
let g:neocomplcache_omni_patterns.perl = '\h\w*->\h\w*\|\h\w*::'
let g:neocomplcache_omni_patterns.c = '[^.[:digit:] *\t]\%(\.\|->\)'
let g:neocomplcache_omni_patterns.cpp = '[^.[:digit:] *\t]\%(\.\|->\)\|\h\w*::'
let g:neocomplcache_omni_patterns.ruby = '[^. *\t]\.\h\w*\|\h\w*::'
" Enable snipMate compatibility feature.
let g:neosnippet#enable_snipmate_compatibility = 1
" Tell Neosnippet about the other snippets
let g:neosnippet#snippets_directory='~/.vim/bundle/vim-snippets/snippets'
" Disable the neosnippet preview candidate window
" When enabled, there can be too much visual noise
" especially when splits are used.
set completeopt-=preview
""
"" Function
""
function! StripTrailingWhitespace()
let _s=@/
let l = line(".")
let c = col(".")
" do the business:
%s/\s\+$//e
" clean up: restore previous search history, and cursor position
let @/=_s
call cursor(l, c)
endfunction
autocmd FileType c,cpp,java,go,php,javascript,python,twig,xml,yml autocmd BufWritePre <buffer> call StripTrailingWhitespace()
""
"" Key mapping
""
nmap <leader>jt <Esc>:%!python -m json.tool<CR><Esc>:set filetype=json<CR>
cmap w!! w !sudo tee % >/dev/null

ruby 的 Heredocs

Capistrano 源码, 在 capistrano / bin / capify 下,发现
here doc 的写法,

1
2
3
4
5
6
7
8
9
10
11
12
13
14
15
16
17
18
...
...
def unindent(string)
indentation = string[/\A\s*/]
string.strip.gsub(/^#{indentation}/, "")
end
...
...
"Capfile" => unindent(<<-FILE),
load 'deploy'
# Uncomment if you are using Rails' asset pipeline
# load 'deploy/assets'
load 'config/deploy' # remove this line to skip loading any of the default tasks
FILE

孤陋寡闻的我立马google 了一把找到篇好文,抄下来分享:

能马上用起来的控制 tomcat 的脚本

难的在网上找到的能马上用起来的 shell 脚本,心情愉悦啊!

1
2
3
4
5
6
7
8
9
10
11
12
13
14
15
16
17
18
19
20
21
22
23
24
25
26
27
28
29
30
31
32
33
34
35
36
37
38
39
40
41
42
43
44
45
46
47
48
49
50
51
52
53
54
#!/bin/bash
export BASE=/home/programs/jakarta-tomcat-5.0.28/bin
prog=jakarta-tomcat-5.0.28
stat() {
if [ `ps auxwwww|grep $prog|grep -v grep|wc -l` -gt 0 ]
then
echo Tomcat is running.
else
echo Tomcat is not running.
fi
}
case "$1" in
start)
if [ `ps auxwwww|grep $prog|grep -v grep|wc -l` -gt 0 ]
then
echo Tomcat seems to be running. Use the restart option.
else
$BASE/startup.sh 2>&1 > /dev/null
fi
stat
;;
stop)
$BASE/shutdown.sh 2>&1 > /dev/null
if [ `ps auxwwww|grep $prog|grep -v grep|wc -l` -gt 0 ]
then
for pid in `ps auxwww|grep $prog|grep -v grep|tr -s ' '|cut -d ' ' -f2`
do
kill -9 $pid 2>&1 > /dev/null
done
fi
stat
;;
restart)
if [ `ps auxwwww|grep $prog|grep -v grep|wc -l` -gt 0 ]
then
for pid in `ps auxwww|grep $prog|grep -v grep|tr -s ' '|cut -d ' ' -f2`
do
kill -9 $pid 2>&1 > /dev/null
done
fi
$BASE/startup.sh 2>&1 > /dev/null
stat
;;
status)
stat
;;
*)
echo "Usage: tomcat start|stop|restart|status"
esac

参见 http://www.techpaste.com/2012/01/shell-script-control-stopstartrestartstatus-tomcat-application-server/

在WebDriver里使用Sizzle.js

##XPATH vs CSS

2008年的时候, 开始使用 Selenium RC 来写 Web 自动化测试,用的是 XPATH 定位,在 Firefox 上工作的很好,可惜在 IE 上跑不起来。
因为后来转去做开发工作,对此问题也没深究。时隔5年,09年时候转测试,已经4年多了。Selenium RC 都变成了 WebDriver, 从2013 GTAC 来看,
WebDriver 逐渐成为 Web 自动化的主流框架。

WebDriver 同样使用 XPATH 和 CSS locator。孰优孰劣,google 一下,一大把,不过目前风向偏向 CSS, 理由如下

  1. 更快(尤其在 IE 上)
  2. 更简单
  3. 更加可读
  4. 符合 Jquery 定位逻辑
  5. XPATH 在不同浏览器上的实现可能不太一样,也许在 Firefox 工作,在 IE 上就不一定了。
  6. CSS 可以引入第三方的 Javascript 库来更好的定位元素, 比如马上要说的 Sizzle.js

我的母亲

有一次,和妻逛超市,谈起了龙应台的目送里其中一个描述母亲的片段,“母亲是搭错了时光机,再也回不来的人。” 后来回到家后,又把书翻出来,重新看了一遍并又和妻说了一遍。我说我妈大概也会变成那样吧。妻说怎会呢,然后想了下,我妈才会呢。

于是突然就很想说说我的母亲。虽然她现在还没有老到糊涂,但是她也藏不住白头发,牙齿也掉了几颗,化妆品也修不好皱纹。时光像一个油画大师,把浓郁的岁月,刻画在她的身上。

每天,她会在那里抱怨,腰酸背痛啊,骨刺啊,颈椎病啊。但饶是如此,却阻止不了她的大嗓门,每个清晨,每个晚上,家里永远是她的声音。而一旦她出门在外,家里就瞬间安静。很久以前,我的外婆也是大嗓门,外婆喊我回家吃饭的声音隔了那么多年,还常常在我耳边回响,即使她已经故去。

母亲年轻的时候,总是抱怨外婆的大嗓门,却不知自己慢慢也成为她抱怨的那种人。外婆说,哪一天我声音轻了,我就死了。后来她真的去了,一点声音都没。

我也常抱怨母亲的大嗓门,有时候实在受不了的时候,就会责怪她,说轻点,会死么?她就会突然不说话,然后把外婆的话说一遍,等我轻的时候,就是我死的时候。

很多人觉得母亲不好,也会和妻说母亲很烦,妻也善解人意,笑笑而已。我想说,其实年轻时候,母亲倒是不烦人的。家里有男人顶着,什么事情也不用管,虽然生活不殷实,也无忧无虑。但是如果儿子五岁丧夫,儿子读大学第二任丈夫又重病缠身至今,哪个女人会不成为祥林嫂?在两次都本应该幸福的时候,总是祸不单行。

母亲进入更年期后,便再也没有出来过。加之父亲重病,家就成了蜗牛壳,母亲一个人背着,还得向前走。于是所有的外交都成了母亲的活,生病之后,父亲变成了一个怕事怕麻烦的人。所以,不行,不好,不准成就了母亲的黑脸,而父亲就成了老好人。家里的房客有事相求的时候,总是偷偷和父亲说,末了还加一句,别给阿姨知道。

家里没有男人顶粱的时候,总是有人欺负。所以不把得以把自己变成男人。所有的人都成了敌人。而父亲病后,家里经济也出现了问题,除了照顾父亲之外还要拼命工作。而在异地上大学的我却依然浑浑噩噩,生活费一分不少的往家里要,课也照样挂。家那头的母亲在通宵为父亲挂号,在严夏烈日下,在狂风嫉雨中,工作挣生计。

这样的生活,直到我大学毕业,慢慢在工作上有所长进,才有所起色。父亲的病也日趋稳定,可以洗洗刷刷。而我开始成家立业。所有人都慢慢的起色起来。只有母亲,依然活在那段困苦的日子里出不来,她依旧大嗓门,依旧黑脸,依旧固执地对所有人都有所戒备。但她依然是我的母亲。

生活在一起的时候,总是讨厌她的啰嗦,她的大嗓门念叨,也从心里不喜欢她的世界观。但是也许很多年后,一定还是会和妻说起,或者和我的孩子说起,母亲就是那个会在你睡着以后,还把你叫醒,告诉你要睡觉的人。

WebDriver 之测试失败自动截图

写 webDriver 测试的时候最头疼的就是调试。 但也远不及运行的时候出错,再回头调试来的痛苦。总所周知, web 自动化的代码都非常脆弱,一份代码一会运行失败,一会运行成功也是很正常的事情。总的来说造成案例运行失败的原因大抵有两点:

  • 环境问题: 比如网络不稳定啊
  • 代码变动: 比如某个元素不在
  • 遇到 bug :这就是真的发现 bug 了

无论哪一种,遇到了都需要花一番时间去 debug。那如果这个时候有一张运行时候出错的截图,那就一目了然了。(即便不一目了然,也有很多帮助)

在运行出错的时候,捕获错误并截图有两种思路:

  1. 自定义一个 WeDdriver 的监听器,在出异常的时候截图。
  2. 利用 Juint 的 TestRule, 自定义一个 Rule 在运行失败的时候截图。

自定义监听器


截图的原理

截图需要用到 RemoteWebDriver。在 Selenium 官方我们可以找到:

One nice feature of the remote
webdriver is that exceptions often
have an attached screen shot, encoded
as a Base64 PNG. In order to get this
screenshot, you need to write code
similar to:

public String extractScreenShot(WebDriverException e) {
  Throwable cause = e.getCause();
  if (cause instanceof ScreenshotException) {
    return ((ScreenshotException) cause).getBase64EncodedScreenshot();
  }
  return null;
}

意思就是说,每个异常都是 ScreenshotException 的对象,转码一下就可以用了。这是截图的本质。

1
2
3
4
5
6
7
8
9
10
11
12
13
14
15
16
17
18
19
20
21
22
23
24
25
26
27
28
29
30
31
32
33
34
35
36
37
38
39
40
41
42
43
44
45
46
47
48
49
50
51
52
53
54
55
56
57
58
59
60
61
import java.io.File;
import java.io.FileOutputStream;
import java.io.IOException;
import java.text.SimpleDateFormat;
import java.util.Date;
import org.openqa.selenium.WebDriver;
import org.openqa.selenium.internal.Base64Encoder;
import org.openqa.selenium.remote.ScreenshotException;
import org.openqa.selenium.support.events.AbstractWebDriverEventListener;
/**
* This is an customized webdriver event listener.
* Now it implements onException method: webdriver will take a screenshot
* when it meets an exception. It's good but not so usable. And when we use
* WebDriverWait to wait for an element appearing, the webdriver will throw
* exception always and the onException will be excuted again and again, which
* generates a lot of screenshots.
* Put here for study
* Usage:
* WebDriver driver = new FirefoxDriver();
* WebDriverEventListener listener = new CustomWebDriverEventListener();
* return new EventFiringWebDriver(driver).register(listener);
*
* @author qa
*
*/
public class CustomWebDriverEventListener extends
AbstractWebDriverEventListener {
@Override
public void onException(Throwable throwable, WebDriver driver) {
Throwable cause = throwable.getCause();
if (cause instanceof ScreenshotException) {
SimpleDateFormat formatter = new SimpleDateFormat(
"yyyy-MM-dd-hh-mm-ss");
String dateString = formatter.format(new Date());
File of = new File(dateString + "-exception.png");
FileOutputStream out = null;
try {
out = new FileOutputStream(of);
out.write(new Base64Encoder()
.decode(((ScreenshotException) cause)
.getBase64EncodedScreenshot()));
}
catch (Exception e) {
e.printStackTrace();
}
finally {
try {
out.close();
}
catch (IOException e) {
e.printStackTrace();
}
}
}
}
}

主要看 onException 这个方法的实现,很明显, 我们捕获了这个异常, 然后通过强制转换将图片提取出来,写入硬盘。

然后就是使用这个监听器, 通常会在 setup 方法里面将这个监听器注册到 WebDriver 中去, 看代码:

1
2
3
4
5
6
7
8
9
@Test
public void setup(){
String remote_driver_url = "http://localhost:4444/wd/hub";
DesiredCapabilities capability = null;
capability = DesiredCapabilities.firefox();
WebDriverEventListener eventListener = new CustomWebDriverEventListener ();
WebDriver driver = new EventFiringWebDriver(new RemoteWebDriver(new URL(
remote_driver_url), capability)).register(eventListener);
}

在这之后,如果运行出错, WebDriver 抛出异常就会在相应的 classpath 下面生成 png 的截图。

自定义 TestRule


和自定义 WebDriver 监听器不同, 自定义 TestRule 只有在这个 Rule 被执行的时候, 才去做一些我们预设的 CallBack。 所以这个截图动作,对于 WebDriver 而言, 是主动的。 那么,我们就需要自定义一个 RemoteWebDriver 来实现截图功能。 WebDriver 自身提供了 TakesScreenshot 这个接口, 我们只要实现它就可以了, 看代码:

1
2
3
4
5
6
7
8
9
10
11
12
13
14
15
16
17
18
19
20
21
22
23
24
25
26
27
28
import java.net.URL;
import org.openqa.selenium.OutputType;
import org.openqa.selenium.TakesScreenshot;
import org.openqa.selenium.WebDriverException;
import org.openqa.selenium.remote.CapabilityType;
import org.openqa.selenium.remote.DesiredCapabilities;
import org.openqa.selenium.remote.DriverCommand;
import org.openqa.selenium.remote.RemoteWebDriver;
public class CustomRemoteWebDriver extends RemoteWebDriver implements
TakesScreenshot {
public CustomRemoteWebDriver(URL url, DesiredCapabilities dc) {
super(url, dc);
}
@Override
public <X> X getScreenshotAs(OutputType<X> target)
throws WebDriverException {
if ((Boolean) getCapabilities().getCapability(
CapabilityType.TAKES_SCREENSHOT)) {
return target
.convertFromBase64Png(execute(DriverCommand.SCREENSHOT)
.getValue().toString());
}
return null;
}
}

然后,我们在加一个封装类, 将截图方法放进去。

WebDriverWrapper.screenShot :

1
2
3
4
5
6
7
8
9
10
11
12
13
14
15
16
17
18
19
20
21
22
23
24
/**
* Function to take the screen shot and save it to the classpath dir.
* Usually, you will find the png file under the project root.
*
* @param driver
* Webdriver instance
* @param desc
* The description of the png
*/
public static void screenShot(WebDriver driver, String desc) {
Date currentTime = new Date();
SimpleDateFormat formatter = new SimpleDateFormat("yyyy-MM-dd-hh-mm-ss");
String dateString = formatter.format(currentTime);
File scrFile = ((TakesScreenshot) driver)
.getScreenshotAs(OutputType.FILE);
try {
desc = desc.trim().equals("") ? "" : "-" + desc.trim();
File screenshot = new File("screenshot" + File.separator
+ dateString + desc + ".png");
FileUtils.copyFile(scrFile, screenshot);
} catch (IOException e) {
e.printStackTrace();
}
}

下面,就是添加 Junit 的 TestRule:

1
2
3
4
5
6
7
8
9
10
11
12
13
14
15
16
17
18
19
20
21
22
23
24
25
26
27
28
29
import org.junit.rules.TestRule;
import org.junit.runner.Description;
import org.junit.runners.model.Statement;
import org.openqa.selenium.WebDriver;
public class TakeScreenshotOnFailureRule implements TestRule {
private final WebDriver driver;
public TakeScreenshotOnFailureRule(WebDriver driver) {
this.driver = driver;
}
@Override
public Statement apply(final Statement base, Description description) {
return new Statement() {
@Override
public void evaluate() throws Throwable {
try {
base.evaluate();
}
catch (Throwable throwable) {
WebDriverWrapper.screenShot(driver, "assert-fail");
throw throwable;
}
}
};
}
}

代码很简单,在抛出 evalate 方法的错误之前,截图。

然后就是使用这个 TestRule, 很简单,只要在你的 测试用例里面加入:

1
2
3
4
5
6
7
8
9
10
11
12
public class MyTest {
...
@Rule
public TestRule myScreenshot = new TakeScreenshotOnFailureRule(driver);
...
@Test
public void test1() {}
@Test
public void test2() {}
...
}

即可。关于 Junit 的 Rule 请自行 google!

两则的比较


总得来说,两种方法都很方便, 也很有效果, 基本都能截图成功。

不同之处在于,

  • RemoteWebDriver 监听器是在 RemoteWebDriver 抛出异常的时候截图。
  • TestRule 是在 assert 失败的时候截图。

我在项目中最早是用第一种方法,后来改用第二种,主要是因为,在自定义的监听器里, 它遇到所有的异常都会截图,这个时候,如果你用了 condition wait 一个 Ajax 的元素, 那就会很悲剧,你会发现在你的目录下面有无数的截图。当初我没有找到解决方法,期待有人提出。

Refer


Jmeter 兵器谱之 Xpath Extractor

前言

这主要是 @AskaNeverEnd 引发的血案。AskaNeverEnd 跑去澳洲不学好,用起了 Jmeter。昨天,他突然问了一个问题,如何用 Jmeter 登陆 Https 的网站。于是我就跑去 Jmeter 官网翻有关 SSL 的信息,发现各种纠结。看文档实在是累啊,于是正好手头项目是用 Https, 不妨一试。结果 Https 没怎么试验,倒是体验了一把 Xpath Extractor。

需求

大家都知道,传统的表单登陆有几个特点:

  1. 有一个特定的 action
  2. 使用 Post 协议
  3. post 参数一般为用户名和密码
  4. 有很多的 hidden input 随机值

比如百度的登陆,就有相当多的 hidden input。这些 hidden input 的 value 在每次请求时,都会随机生成不同的值。所以你不得不把它提取出来,参数化。于是我们就用到了 XPATH Extractor。

实践

假设我们有这样一个登陆的form:

<form action="/login" method="post">
  <input id="username" name="username" type="text" value="">
  <input id="password" name="password" type="password" value="">
  <input type="hidden" name="lt" value="20120001">
  <input type="hidden" name="_eventId" value="submit">
  <input class="btn-submit" name="submit" value="Log In" type="submit">
</form>

可以看到有两个 hidden input, 其中 lt 值是每次刷新页面时候,随机生成的值,另外一个是固定。那我们的策略是:

  1. 第一次请求这个页面时候,获取随机生成的 lt 值。
  2. 用这个获得的 lt 值,和用户名,密码一起做为 post 的参数,传递到后台去。

所以在jmeter里面,先创建一个 HTTP 请求,这个请求的作用就是访问网站登录页面,并在这个请求填加后置处理器: XPATH Extractor,来提取请求返回的 html response 里面的 lt 的值。

alt text

然后在 XPATH Extractor 里,将要提取 lt 的 XPATH query 填写正确, 如下

alt text

在第一个 http 的请求中,我们取得了 lt 的值。接着我们创建第二个 http request, 这次要完成的就是将这些参数 post 到 form 制定的 action 中去。

alt text

需要注意的是,这次的方法变成了 Post, 还有参数都要填写到参数列表中,注意那个 lt 值, jmeter 使用 ${} 获取参数的值。

好,大功告成,试试看吧。


XPATH Extractor 详说

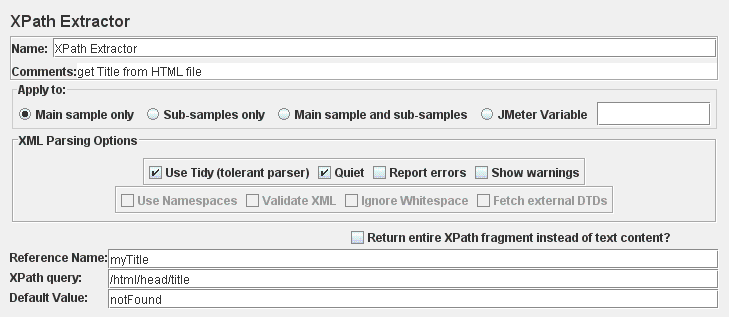
盗用下Apache上的图片:
alt text

我们来一一解说下,这些图片上的属性,英语好的人可以直接移步 Apache Jmeter Xpath Extractor

Name: XPATH Extractor, 就是一个该节点的描述信息,你可以任意更改,会立刻反应在你的节点树上。
Comments: 同样也是描述信息。
Apply to:一般只针对于那些有子 sample 的 sample, apply to 有4种:

  • Main sample only: 只对主 sample 起作用。
  • Sub-samples only: 只对子 sample 起作用。
  • Main sample and sub-samles: 两种都起作用。
  • JMeter Varibale: 这个变量是用于 JMeter的assertion, assertion 会对这个变量的内容起作用。

XPATH的会对每一个被 Apply to 的 Sample 依次起作用, 并所有的匹配结果都会返回。

XPATH Parsing Options

Use Tidy(tolerant parser): 如果选择 Use Tidy, 就是解析response的时候将 HTML 转成 XHTML。

  • 对于所有的 HTML response, 我们应该选择 Use Tidy, 这样的 response 会被转为有效的 XHTML。
  • 对于所有的 XHTML 和 XML, 就不需要再选择使用 Use Tidy 了。

Quiet: tidy 的 quiet flag 设置, 选中了会抑制一些不必要的输出。
Report error: 如果 Tidy 发生错误, 那么触发相应的 Assertion。
Show warnings: 显示 Tidy Warning 信息的开关。

Use NamespacesValidate XMLIgnore WhitespaceFetch External DTDs 这四个只有在 Use Tidy 没有选中才会被激活。

Use Namespaces: 如果选中此选项,那么 XML 解析器会使用命名空间,我也不是很熟这一块,可以参考
XML解析中的namespace初探

Validate XML: 验证 XML 是不是 well formed。

Ignore Whitespace: 忽略空格字符

Fetch External DTDs: 获取外部的 DTD 文件

Return entire XPath fragment instead of text content?: 这个很简单,举个例子:

html 片段是:

<titile>
Apache JMeter
</title>

那么,//title 会返回 “<title>Apache JMeter</title>“ 而不是 “Apache JMeter”.

Reference Name: 就是用来存放 XPATH 提取出来的值。
XPath Query: XPATH 的查询语句。
Default Value: 默认值。

JMeter 兵器谱之 ForEach Controller

同样的,英文好的同学请移驾ForEach Controller

ForEach controller 是用来遍历集合的,比如 XPATH Extractor 或者 正则表达式 Extractor 解析出来的集合。ForEach做的事情大致有2件,

  1. 取得集合
  2. 遍历集合,将每一个值应用到 ForEach 下面的 Smapler 或者 controller 中去。

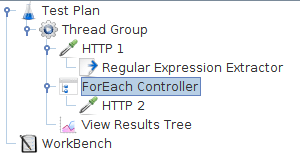
来看一个例子,我们要访问百度首页,取得首页所有的链接,然后访问这些链接。我们要做的是:

  1. 用一个 http sample 访问 http://www.baidu.com
  2. 在这个 sample 下添加一个正则表达式提取器,使用 <a href=”([^”]+)” 提取所有的 link 的 href 值。
  3. 用 ForEach Controller 遍历第2步提取出来的 href 值,然后一一访问。

JMeter 脚本结构大致如下,

alt text

先来看正则表达式提取器

alt text

注意这个引用名称 inputVar, 提取出来的所有匹配值都会放在这个变量里,事实上 inputVar 相当于一个 set 了。然后我们在紧跟的 ForEach 里面使用这个变量。

alt text

可以看到,在 ForEach 里,我们将之前的 inputVar 设置为输入变量。然后用 returnVar 做为输出。 这其实就类似于 JAVA 里面的 ForEach。

for(Object returnVar : inputVar) {
//process
}

这个 process 过程就是下图所示:
alt text

Jmeter 兵器谱之 Regular Expression Extractor

接着我之前的血案,无意间学会了如何使用Jmeter里面的Regular Expression Extractor。
搞定了Jmeter脚本的一些基本配置,然后我开始跑脚本。非常顺利,但是问题也出现了,
有个统计多少用户登陆的功能始终显示用户数量稳定在一个数字,没有增加。
仔细观察了result tree里面的结果(个人十分喜欢result tree,因为可把request,response看个通透。),
发现,由于脚本是录制下来的,所以每次发送的token都是同一个,所以系统自然认为是同一个用户不断的在登陆。

需求出来了,我需要从某个httprequest的response中提取部分参数,作为下一个request的部分参数。

alt text

如图,第二个str后面的字串就是用户的token,我需要把它传入下一个request的参数中去。

alt text

在需要获取response参数的那个request下面挂上一个Regular Expression Extractor.

alt text

对Regular Expression Extractor界面的一些地方做下说明:

alt text

response field to check: 需要你自己选定是对response的内容还是头,还是url进行抓取。

reference name: 抓取出来的变量名称,自己取名,因为之后你需要用到。

regular expression: 这个是最重要的,正则表达式就写在这里。 正则表达式的正确与否,是你抓取的关键。

template: 提取正则表达式里面的内容,通常我们只提取一个字串,所以通常都是$1$。

match number: 匹配数字, 通常我们只提取一个字串,所以写1无妨。

Default Value: 缺省值,用于没有抓取到值时的处理。

这样,我们通过{var}的方式,把变量写入request里面。

alt text

然后,跑了一下整个脚本,发现一切都正常了,这场“血案”暂告一个段落。

|