HtmlUnit 介绍

在 @Lily 的 Juint4 + WebDriver 入门篇 中, Lily 问起了 HtmlUnit Driver。对 HtmlUnit Driver 我倒是没有接触太多, 所以特意去找了些文章看看。

selenium 官方 wiki 上说:

This is currently the fastest and most lightweight implementation of WebDriver. As the name suggests, this is based on HtmlUnit.

所以想要了解 HtmlUnit Driver, 就必先追根溯源地研究下 HtmlUnit。

HtmlUnit is a “GUI-Less browser for Java programs”. It models HTML documents and provides an API that allows you to invoke pages, fill out forms, click links, etc… just like you do in your “normal” browser.

简单来说, HtmlUnit 就是没有界面的,你看不见的,但是却能做浏览器的活的 JAVA 版本的浏览器。需要说明的是,HtmlUnit 本身不是一个测试框架, 它真的只是一个模拟浏览器行为的程序。 所以需要和 Junit 或者 TestNG 等测试框架配合起来使用。同时,很多开源的工具也使用 HtmlUnit 来模拟浏览器行为,比如大名鼎鼎的 WebDriver。

下面,搬抄一把 HtmlUnit 的入门指南:

建立项目

使用 maven 创建一个 htmlunit 的试用项目

mvn archetype:generate -DgroupId=com.testchina -DartifactId=my-htmlunit-test -DinteractiveMode=false

(不得不夸下 Maven, 构建的好工具啊。)

修改 pom.xml, 加入 HtmlUnit 依赖, 升级 Junit 为4.10。

1
2
3
4
5
6
7
8
9
10
11
12
13
14
15
16
17
18
19
20
21
22
23
24
25
26
27
28
29
30
31
32
<project xmlns="http://maven.apache.org/POM/4.0.0" xmlns:xsi="http://www.w3.org/2001/XMLSchema-instance"
xsi:schemaLocation="http://maven.apache.org/POM/4.0.0 http://maven.apache.org/xsd/maven-4.0.0.xsd">
<modelVersion>4.0.0</modelVersion>
<groupId>com.testchina</groupId>
<artifactId>my-htmlunit-test</artifactId>
<version>1.0-SNAPSHOT</version>
<packaging>jar</packaging>
<name>my-htmlunit-test</name>
<url>http://maven.apache.org</url>
<properties>
<project.build.sourceEncoding>UTF-8</project.build.sourceEncoding>
</properties>
<dependencies>
<dependency>
<groupId>junit</groupId>
<artifactId>junit</artifactId>
<version>4.10</version>
<scope>test</scope>
</dependency>
<dependency>
<groupId>net.sourceforge.htmlunit</groupId>
<artifactId>htmlunit</artifactId>
<version>2.10</version>
</dependency>
</dependencies>
</project>

然后,执行:

  1. mvn install
  2. mvn eclipse:eclipse

之后, 就可以在 eclipse 里导入项目。接着,我们来写第一个例子。

试用

第一个例子:

a. 访问 http://htmlunit.sourceforge.net

b. 验证网页的 titile

c. 验证网页内容

1
2
3
4
5
6
7
8
9
10
11
12
13
14
15
16
17
18
19
20
21
package com.testchina;
import static org.junit.Assert.*;
import org.junit.Test;
import com.gargoylesoftware.htmlunit.WebClient;
import com.gargoylesoftware.htmlunit.html.HtmlPage;
public class MyHtmlUnitTest {
@Test
public void homePage() throws Exception {
final WebClient webClient = new WebClient(); // 建立 WebClient。
final HtmlPage page = webClient.getPage("http://htmlunit.sourceforge.net"); // 访问网站,返回页面对象。
assertEquals("HtmlUnit - Welcome to HtmlUnit", page.getTitleText()); // 验证 title。
/** 验证网页内容 */
final String pageAsXml = page.asXml();
assertTrue(pageAsXml.contains("<body class=\"composite\">"));
final String pageAsText = page.asText();
assertTrue(pageAsText.contains("Support for the HTTP and HTTPS protocols"));
webClient.closeAllWindows();
}
}

第二个例子: 指定浏览器

1
2
3
4
5
6
7
8
9
@Test
public void homePage_Firefox() throws Exception {
final WebClient webClient = new WebClient(BrowserVersion.FIREFOX_10);
final HtmlPage page = webClient
.getPage("http://htmlunit.sourceforge.net");
assertEquals("HtmlUnit - Welcome to HtmlUnit", page.getTitleText());
webClient.closeAllWindows();
}

很简单,在初始化 WebClient 的时候,传入浏览器版本, 目前 2.10 里面支持:

1
2
3
4
5
6
7
8
9
10
11
12
13
14
15
16
17
18
19
20
21
22
23
24
25
/** Register plugins for the browser versions. */
static {
INTERNET_EXPLORER_6.initDefaultFeatures();
INTERNET_EXPLORER_7.initDefaultFeatures();
INTERNET_EXPLORER_8.initDefaultFeatures();
FIREFOX_3.initDefaultFeatures();
FIREFOX_3_6.initDefaultFeatures();
FIREFOX_10.initDefaultFeatures();
final PluginConfiguration flash = new PluginConfiguration("Shockwave Flash",
"Shockwave Flash 9.0 r31", "libflashplayer.so");
flash.getMimeTypes().add(new PluginConfiguration.MimeType("application/x-shockwave-flash",
"Shockwave Flash", "swf"));
FIREFOX_3.getPlugins().add(flash);
FIREFOX_3_6.getPlugins().add(flash);
FIREFOX_10.getPlugins().add(flash);
CHROME_16.initDefaultFeatures();
CHROME_16.setApplicationCodeName("Mozilla");
CHROME_16.setPlatform("MacIntel");
CHROME_16.setCpuClass(null);
CHROME_16.setBrowserLanguage("undefined");
// there are other issues with Chrome; a different productSub, etc.
}

第三个例子: 获取页面元素

1
2
3
4
5
6
7
8
9
10
11
12
13
14
15
@Test
public void getElements() throws Exception {
final WebClient webClient = new WebClient();
final HtmlPage page = webClient.getPage("http://htmlunit.sourceforge.net");
//get list of all divs
final List<?> divs = page.getByXPath("//div"); // 返回所有的div
System.out.println(((HtmlDivision)divs.get(0)).asText()); // 得到第一个 Div 节点的内容。
/** 返回所有的超链接, 并打印 name 属性*/
final List<HtmlAnchor> anchors = page.getAnchors();
for (HtmlAnchor anchor : anchors) {
System.out.println(anchor.getAttribute("name"));
}
webClient.closeAllWindows();
}

第四个例子: 提交表单

1
2
3
4
5
6
7
8
9
10
11
12
13
14
15
16
17
18
19
20
21
22
@Test
public void submittingForm() throws Exception {
final WebClient webClient = new WebClient();
// Get the first page
final HtmlPage page1 = webClient.getPage("http://some_url");
// Get the form that we are dealing with and within that form,
// find the submit button and the field that we want to change.
final HtmlForm form = page1.getFormByName("myform");
final HtmlSubmitInput button = form.getInputByName("submitbutton");
final HtmlTextInput textField = form.getInputByName("userid");
// Change the value of the text field
textField.setValueAttribute("root");
// Now submit the form by clicking the button and get back the second page.
final HtmlPage page2 = button.click();
webClient.closeAllWindows();
}

是不是很棒? 所有浏览器能做的,它都能做,我们再来看下它的特性:

  • 支持 HTTP and HTTPS 协议
  • 支持 cookies
  • 支持 Post, Get, Head, Delete
  • 支持代理
  • 能分析 HTTP responses
  • 能自定义 HTTP request head
  • 支持 Javascript

于是有
第五个例子: 使用 javascript

这里的 Javascript 的意思,是指 HtmlUnit 可以通过 js 引擎执行 javascript 代码。

HtmlUnit provides excellent JavaScript support, simulating the behavior of the configured browser (Firefox or Internet Explorer). It uses the Rhino JavaScript engine for the core language (plus workarounds for some Rhino bugs) and provides the implementation for the objects specific to execution in a browser.

比如我们的页面有一个 alert 事件:

1
2
3
<html><head><title>Alert sample</title></head>
<body onload='alert("foo");'>
</body></html>

我们如何捕捉它呢?

1
2
3
4
5
6
7
8
9
10
11
12
13
14
@Test
public void alerts() throws Exception {
final WebClient webClient = new WebClient();
final List collectedAlerts = new ArrayList();
webClient.setAlertHandler(new CollectingAlertHandler(collectedAlerts));
// Since we aren't actually manipulating the page, we don't assign
// it to a variable - it's enough to know that it loaded.
webClient.getPage("http://tciludev01/test.html");
final List expectedAlerts = Collections.singletonList("foo");
assertEquals(expectedAlerts, collectedAlerts);
}

是不是很轻巧? 像真正的浏览器一样, HtmlUnit 可以响应各种 Javascript 事件, 执行各种 Javascript 代码。


对于 HtmlUnit, 我就初略看了看, 总的印象是轻,不用启动笨重的浏览器就能做到和浏览器一样的行为, 和 Junit4 很好的搭配,可以
写出轻巧优美的测试案例, 同时也能为测试省去不少时间。这在前期测试驱动开发的时候,特别是 Web 应用开发,可以节省去不少时间。

参见:

http://htmlunit.sourceforge.net/

http://maven.apache.org/guides/getting-started/maven-in-five-minutes.html

http://code.google.com/p/selenium/wiki/HtmlUnitDriver

http://htmlunit.sourceforge.net/javascript-howto.html
windows 下查找占用端口的进程

一直只知道 *nux 下的命令,对 windows 知之甚少,其实 windows 下也有很多强大的命令。

比如在 linux 下查看一个 mysql 的端口,

1
2
3
4
5
6
➜ octopress git:(source) ✗ netstat -an | grep 3306 # mac 下的命令没有 linux 下来的丰富啊,没有 p 选项。
tcp4 0 0 *.3306 *.* LISTEN
root@li493-58:~# netstat -anp | grep 3306 # 这是 ubuntu 下面的。
tcp 0 0 0.0.0.0:3306 0.0.0.0:* LISTEN 2509/mysqld

很方便吧。那么如果在 windows 下呢?

1
2
3
4
netstat -ano | findstr 3306 # 这里会把 pid 告诉你,比如 pid 是 1278
tasklist /fi "pid eq 1278" # 这样就找到了 1278 对应的进程

也是很简单的吧!

使用 capybara 登陆百度

ShiLongLu 问你有什么办法测试百度的登录窗口呢?这是差不多2个月前的问题了,我一直忙于 Dota 圣剑传说。恰巧春节有时间看了下。

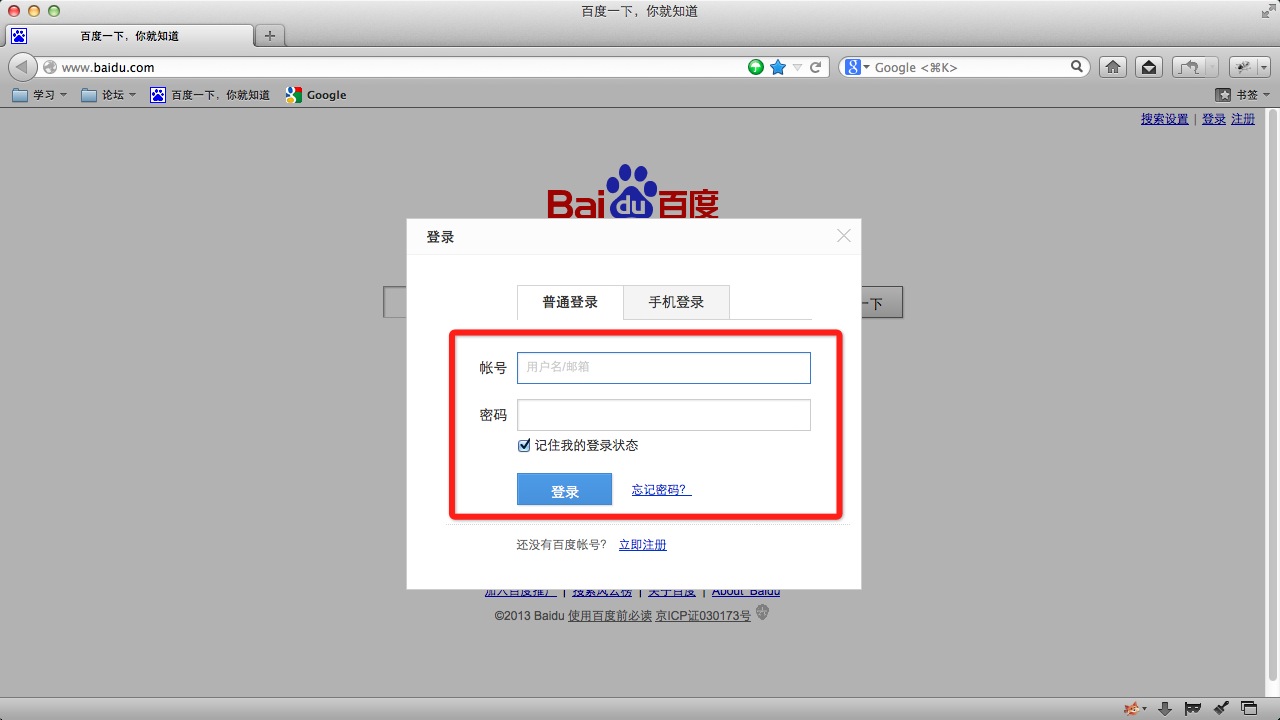
百度登陆的时候是弹出一个对话框,如图:

但是这个对话框是用 iframe 实现的。

1
2
3
4
5
<iframe height="100%" frameborder="0" width="100%" scrolling="no" src="http://www.baidu.com/cache/user/html/login-1.2.html" marginheight="0" marginwidth="0" id="login_iframe">
...
...
...
</iframe>

所以在填写用户名和密码的时候,需要先 switch 到这个 frame 上去,

When working inside a frame, you should use Capybara’s within_frame method.

  • (Object) within_frame(frame_id)

Execute the given block within the given iframe given the id of that iframe. Only works on some drivers (e.g. Selenium)

Parameters:
frame_id (String) — Id of the frame

所以我们的实现基本如下:

baidu.feature:

1
2
3
4
5
6
7
Given I am on baidu.com
When I click "登录"
And I switch to login form
And I enter "lihuazhang@hotmail.com" for "帐号"
And I enter "204646" for "密码"
And I click "登录" button
Then I should see "zhangzuichi"

step_definition.rb:

1
2
3
4
5
6
7
8
9
10
11
12
13
14
15
16
17
When /^I enter "(.*?)" for "(.*?)"$/ do |value, key|
if key == "帐号"
within_frame 'login_iframe' do
fill_in 'pass_login_username_0', :with => value
end
else
within_frame 'login_iframe' do
fill_in 'pass_login_password_0', :with => value
end
end
end
When /^I click "(.*?)" button$/ do |arg1|
within_frame 'login_iframe' do
click_button 'pass_login_input_submit_0'
end
end

大致如此,在 firefox 下测试通过。

告别2012

2011年6月我离开AMD,进入现在这家公司,转眼2年快过去了。现在每次和同事聊起来,都觉得其实现在的这家公司很亏。
我们几乎所有的员工在这里都完成了各自人生的大事。比如结婚,比如生子,比如怀孕。到了我这种年纪的人事业慢慢靠边站,
婚姻家庭走上舞台。这或多或少的对公司总会有点影响。

2012年9月中旬,和小顾去香港兜了一圈。
2012年10月1日,我在家里操办了婚宴。之后和小顾开始了两人生活。
2012年11月,报名练车。
2012年12月,练车。
2013年1月,去北京兜了一圈。加练车。
2013年2月,小顾小路过了。我还没考。过春节。

公司比起2011年来更加不景气,美国裁员之后,真正做事的都走了,剩下一些开会和管事的人。上海部门和美国的沟通也越发的困难,我们从本来的一个研发部门变成了一个信息孤岛,彻底成了美国总部的一个外包。大家抱怨的声音也越来越大,头儿们也不知道如何安慰。春节房间前, Jacky 提出了离职,大家唏嘘不已。

业余时间做的游戏不好不坏,在这里打个广告,Doat 圣剑传说, android 和 ios 同步发布。

瞧着不错吧!欢迎大家试玩,也希望大家能帮忙宣传下,我们不会做营销,只有口口相传的用户。当然口碑不错。

2012年,过得不好不坏,咋一想,啥也回忆不起来,唯有那次在北京滑雪,从山顶一冲而下的光景。

映射 Windows cmd 可以读取的磁盘驱动

在 windows 下, 通常我们映射一个网路驱动到本地的时候, 会在本地生成一个文件夹与之映射。
然后我们就可以通过这个文件夹访问和操作资源(当然你得有权限),好像操作本地文件一样。但是这样,
似乎就不能通过命令行访问。(不知道为什么,但是最近遇到这个问题)

贴出解决方法:

1. 进入命令行窗口。

使用 Alt + F2, 然后输入 cmd, 回车。 或者从开始菜单,运行那里输入cmd,回车。

2. 输入net use X: \\path\to\share, X 是你要映射的盘符, \path\to\share 就是你的网络驱动地址。

3. 回车,然后成功~

surround.vim

一般写东西的时候,总会遇到比如写了一长串文字后,突然想给这串文字头尾加个括号,
或者引号。其实很多编辑器都提供这种功能,选中,然后输入括号。但是一直用 Vim,也没发现
有这种功能, 也只能怪自己没有研究。 后来网上找了一圈, 发现了原来有这个插件: surround.vim

Surround.vim is all about “surroundings”: parentheses, brackets, quotes, XML tags, and more. The plugin provides mappings to easily delete, change and add such surroundings in pairs.

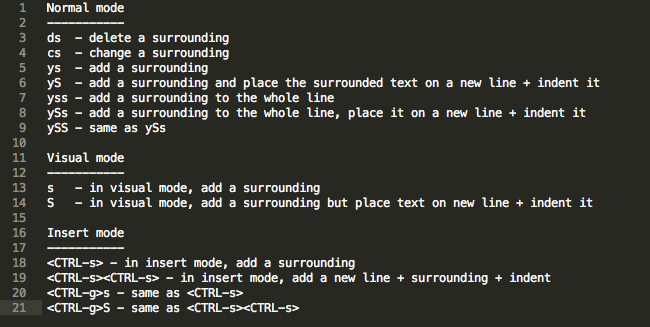
先看下全部的快捷键:

可以看到基本有三种操作:

  • 删除

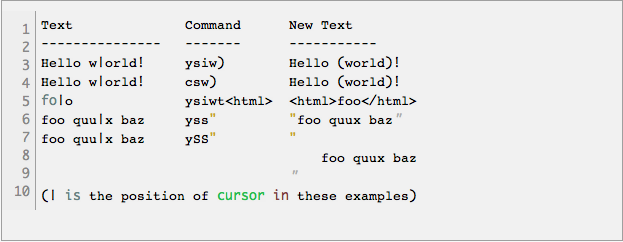
ds 加包在两边的引号,括号或者标签(标签全部用t代替)。

e.g:

“hello, world!” => hello, world! 只要输入 ds"

\hello, world!\ => hello, world! 只要输入 dst

  • 添加

note: s 代表sentence iw/w 代表 word。

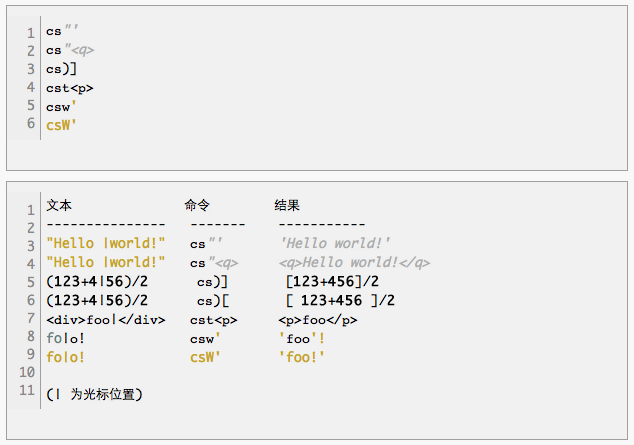
  • 修改

截图来自你应该知道的vim插件之surround.vim

到此, surround vim 你就基本掌握了。 如果你对这些快捷键能倒敲入流,那么你一定能得到许多的便捷。 XD

扩展阅读: Text Object

小清新 Outlook 试用记

我不得不说,outlook 不错。Metro 风格像清新的风让人觉得惬意。目前 outlook 提供从 hotmail 升级和注册新用户两种方式。

登入Hotmail

点击了解详情, 进入Outlook 预览页面

点击试用 Outlook进入注册页面,在这个页面你可以试用原先的 hotmail 邮箱,也可以注册一个新的 outlook 的邮箱。

我将我的 hotmail 升级了一把。然后登陆 outlook, 登陆之后的界面:

很棒吧! 干净清爽!

用半小时粗略的试用了 outlook 的各种功能。为之倾倒,不吝言辞,我来说几句。

WebDriver 4: 加上叶子

在前三篇WebDriver文章里,我们基本上有了一个Maven WebDriver Junit4的框架主干,这些还远远不够。
所以我们要添些叶子。

  • 要有资源配置文件
  • 要有WebDriver的封装
  • 要有业务对象的抽象,比如用户
  • 要有自定义的异常

我们大概期望有这样的文件架构:

1
2
3
4
5
6
7
8
9
10
11
12
.
├── main
│   ├── java
│   │   └── com.ahchoo.automation.exception
│   │   └── com.ahchoo.automation.model
│   │   └── com.ahchoo.automation.page
│   │   └── com.ahchoo.automation.utils
│   └── resources
└── test
├── java
│   └── com.ahchoo.automation.testcase
└── resources

###配置文件

Maven 有自己的资源文件管理策略,我们只需要修改之前的pom.xml

1
2
3
4
5
6
7
8
9
10
11
12
13
14
15
16
17
18
<project xmlns="http://maven.apache.org/POM/4.0.0" xmlns:xsi="http://www.w3.org/2001/XMLSchema-instance"
xsi:schemaLocation="http://maven.apache.org/POM/4.0.0 http://maven.apache.org/maven-v4_0_0.xsd">
...
<build>
<resources>
<resource>
<directory>src/main/resources</directory>
</resource>
</resources>
<testResources>
<testResource>
<directory>src/test/resources</directory>
</testResource>
</testResources>
</build>
...
</project>

我们指定了两个资源文件目录,然后将config.xml放在这些目录之下。
注意,src/main/resouces下的文件只能在运行main里面的代码的时候才会用到,同样的src/test/resources下的配置文件只有在运行测试的时候才会加载。

可以将浏览器类型, 远程服务器地址, 应用URL之类放到config.xml中去。

1
2
3
4
5
6
7
8
9
10
<config id="config">
<BaseUrl>http://www.baidu.com</BaseUrl>
<Browser>
<type>Firefox10</type>
<location>pathToBrowser</location>
<remote>192.168.1.248</remote>
</Browser>
<user name="xxx" password="xxx" />
</config>

Sauce OnDemand试用

闲着无聊,试用了下saucelabs
先注册用户,这个略过不说。

saucelabs有两种方式:

  1. Sauce Scout

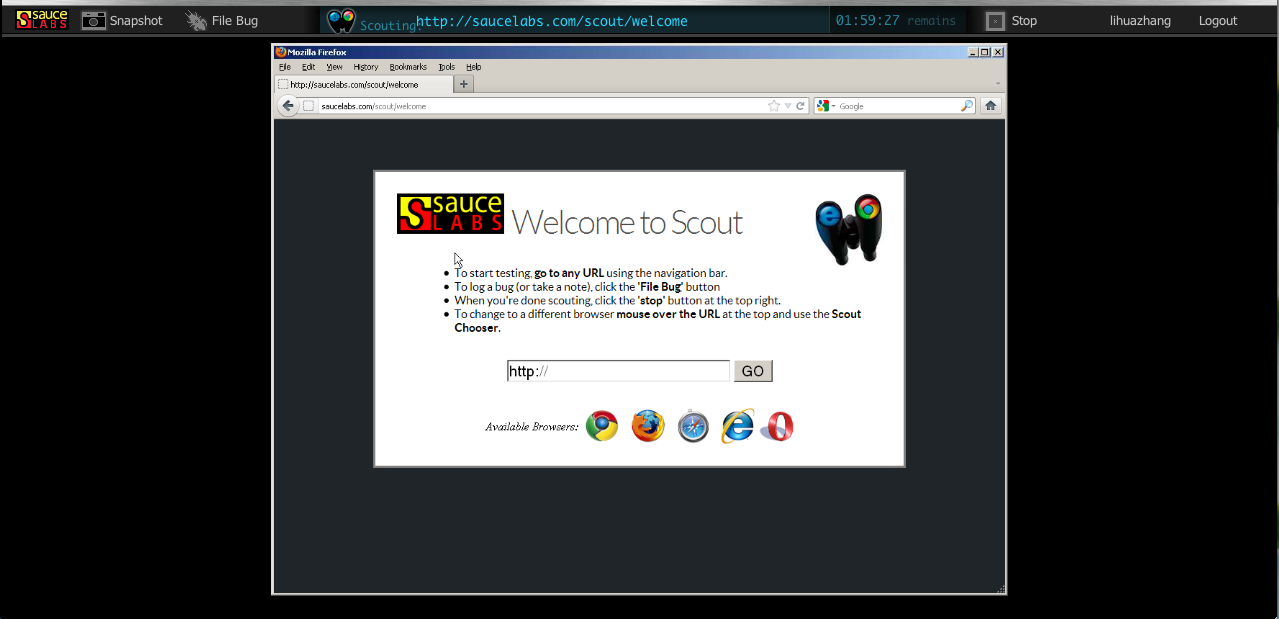
    通过访问架在云端的浏览器(cloud-hosted browsers)执行测试用例。相当于saucelabs给用户提供了多种多样组合的虚拟机,只不过这个虚拟机就只有一个浏览器。如图:
    sourcescout

    Saucelabs提供了许多方案,对于那些没有空间部署环境的公司,这个服务的确很贴心。

  2. Sauce OnDemand

    Sauce OnDemand就是所谓的自动化了。我们利用WebDriver或者Selenium RC的remote server来指定SauceLabs提供的浏览器配置,进行各种自动化测试。

那我们开始试用Sauce OnDemand,英语好的攻城狮们请直接移步Get Started

为了方便起见,我就用ruby。首先确保你安装了selenium-webdriver,如果没有安装,在终端用以下命令安装:

1
gem install selenium-webdriver

输入以下代码:注意: 代码中的:url请替换成你自己的,不过我不知道这个url到底是哪里来的,
我是从get started里面的例子里找到的。

1
2
3
4
5
6
7
8
9
10
11
12
13
14
15
16
17
18
19
20
21
22
23
24
25
26
require 'rubygems'
require "test/unit"
require 'selenium-webdriver'
class ExampleTest < Test::Unit::TestCase
def setup
caps = Selenium::WebDriver::Remote::Capabilities.firefox
caps.version = "5"
caps.platform = :XP
caps[:name] = "Testing Selenium 2 with Ruby on Sauce"
@driver = Selenium::WebDriver.for(
:remote,
:url => "http://lihuazhang:ba444e83-206c-4a9c-b008-4da920d7f852@ondemand.saucelabs.com:80/wd/hub",
:desired_capabilities => caps)
end
def test_sauce
@driver.navigate.to "http://saucelabs.com/test/guinea-pig"
assert @driver.title.include?("I am a page title - Sauce Labs")
end
def teardown
@driver.quit
end
end

运行ruby basic-example.rb

1
2
3
4
5
6
7
8
9
Run options:
# Running tests:
.
Finished tests in 44.647462s, 0.0224 tests/s, 0.0224 assertions/s.
1 tests, 1 assertions, 0 failures, 0 errors, 0 skips

可以看到运行成功,我们再去sauce的Account页面里去看下运行的结果。

account

可以看到页面里有video和log下载,打开log我们可以看到运行的录像,而log就记录了运行的信息。
此外,我们更可以点开测试用例,查看更多的细节。

但是一般我们测试环境都是内网,为了满足这个条件,Saucelabs提供一条通道叫Sauce Connect。

Sauce Connect creates a secure and reliable tunnel from our cloud to your private network that can only be accessed by you. This eliminates the need to whitelist IPs, open any ports on your firewall or go through any changes in your tests.
Sauce Connect is not only for accessing private servers. If you want all of your test traffic to be secure and reliable, even the Selenium instructions you send to Sauce, you can use Sauce Connect for that too!

Get Started:

1.先下载Sauce Connect

2.解压然后运行java -jar Sauce-Connect.jar lihuazhang ba444e83-206c-4a9c-b008-4da920d7f852

  1. 确定tunnel start以后,接下去你就可以运行你的测试用例了。

我们再来看下刚刚那个测试用例,让程序navigate.to到本地。

1
2
3
4
5
6
7
8
9
10
11
12
13
14
15
16
17
18
19
20
21
22
23
24
25
require 'rubygems'
require "test/unit"
require 'selenium-webdriver'
class ExampleTest < Test::Unit::TestCase
def setup
caps = Selenium::WebDriver::Remote::Capabilities.firefox
caps.version = "5"
caps.platform = :XP
caps[:name] = "Testing Selenium 2 with Ruby on Sauce"
@driver = Selenium::WebDriver.for(
:remote,
:url => "http://lihuazhang:ba444e83-206c-4a9c-b008-4da920d7f852@ondemand.saucelabs.com:80/wd/hub",
:desired_capabilities => caps)
end
def test_sauce
@driver.navigate.to "http://localhost:3000" # Set a local env.
end
def teardown
@driver.quit
end
end

再运行一遍,必然成功啊~

我们看下Sauce-Connect.jar的日志,可以看到这个tunnel起到了一个中转的作用。

1
2
3
4
5
6
7
8
9
10
11
12
13
14
15
16
17
2012-04-25 00:04:01,184 - connection to Sauce Connect server closed
2012-04-25 00:04:01,927 - old keepalive timer shutting down
2012-04-25 00:04:03,923 - Successful handshake with Sauce Connect server
2012-04-25 00:04:03,927 - resending 2 packets
2012-04-25 00:04:04,078 - Tunnel host version: 0.1.0, remote endpoint ID: 73b1e202231b41a3802aab8785caf15f
2012-04-25 00:05:19,002 - relative URL, constructing absolute from Host header
2012-04-25 00:05:19,003 - using constructed absolute URL: http://localhost:3000/
2012-04-25 00:05:19,007 - Could not proxy /, exception: java.net.ConnectException: Connection refused
2012-04-25 00:05:22,145 - relative URL, constructing absolute from Host header
2012-04-25 00:05:22,147 - using constructed absolute URL: http://localhost:3000/favicon.ico
2012-04-25 00:05:22,148 - Could not proxy /favicon.ico, exception: java.net.ConnectException: Connection refused
2012-04-25 00:05:22,589 - relative URL, constructing absolute from Host header
2012-04-25 00:05:22,592 - using constructed absolute URL: http://localhost:3000/favicon.ico
2012-04-25 00:05:22,594 - Could not proxy /favicon.ico, exception: java.net.ConnectException: Connection refused
2012-04-25 00:05:23,391 - GET http://feeds.bbci.co.uk/news/rss.xml?edition=int -> 200 (2847ms)
2012-04-25 00:05:53,084 - disconnected from Sauce Connect server
2012-04-25 00:05:53,085 - connection to Sauce Connect server closed

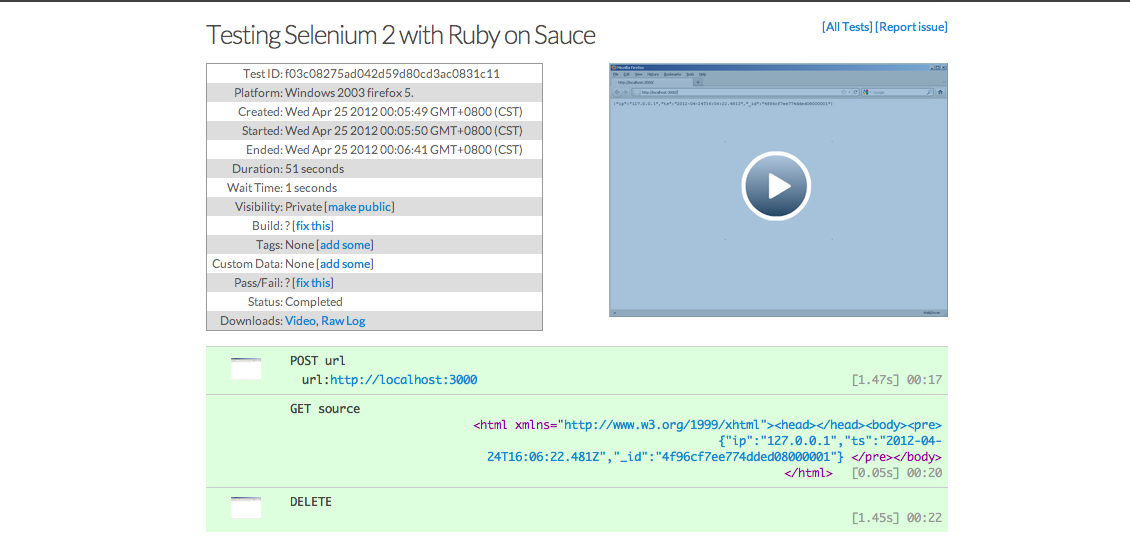
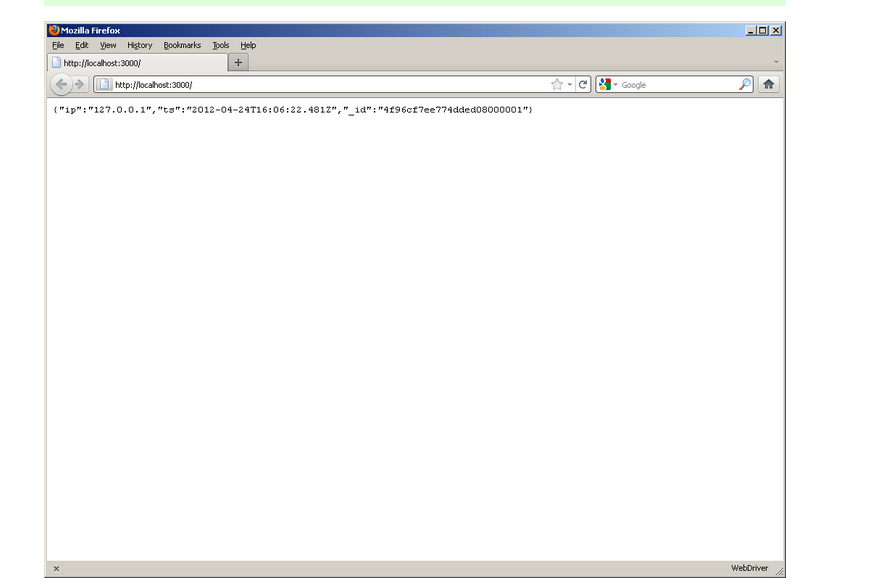
同样的,我们可以在Account里面看到这个测试用例的运行细节,如图:

detail

detail

不错吧,有兴趣,自己动手试试。

mysql5 清空root密码

最近在windows用mysql,在root上设置了密码,很不方便,于是就想去清空它,网上找了下教程,总结了下。肯定好用。

  • 停止MySQL的服务。

  • 用mysqld.exe –skip-grant-tables & (会占用一个dos控制台窗口)

  • 重新打开一个dos控制台窗口,进入mysql

1
2
3
4
mysql -uroot
use mysql
update user set password=password("") where user='root';
flush privileges;
  • 关闭MySQL的控制台窗口,用正常模式启动Mysql

  • 你可以用新的密码链接到Mysql了。

Note:

Please specify the defaults file when you find the above instructions do not have effects.

  • 用mysqld.exe –defaults-file=”C:\ProgramData\MySQL\MySQL Server 5.5\my.ini” –skip-grant-tables & (会占用一个dos控制台窗口)
|